How to Transfer Data from Old Chromebook to New Chromebook

When buying new gadgets, it’s really important to be able to transfer all data from the old laptop to the new one, so you don’t lose track of your work or studies.
The process of transferring files can at times be challenging, especially if the data transfer is between two different types of products, from different manufacturers.
However, transferring data between two Chromebooks is not too complicated. Since Chromebook gadgets are connected to Google’s Services by default, you can upload almost anything you have stored on your laptop, and retrieve it without any issues whatsoever.
Hence, the transfer between two Chromebook devices will go smoothly and quickly, since you don’t need any type of external hard drives, flash drives, or any additional techniques to get on track to use your new gadget.
Therefore, we will guide you through the process of transferring your data in the guide below, so keep reading to see the guide.
How do I transfer my files from my old Chromebook to my new one?
As we mentioned, Chromebooks are constantly connected to Google’s services.
However, this wasn’t the case since Chromebooks launched. Previously, Chrome OS didn’t have any type of data transferring methods integrated into their systems.
Luckily, Chromebooks kept evolving through the course of the years, and are currently among the best gadgets on the market when it comes to moving files from one device to another.
Adding the files to Google Drive
The best method of transferring data from your old device to the new one is to upload all files to Google Drive. Since you probably don’t need every single file you have on your laptop, this might be the perfect opportunity for you to finally clean up files and photos you’ve had for years, but don’t need anymore.
To upload your files, follow these steps:
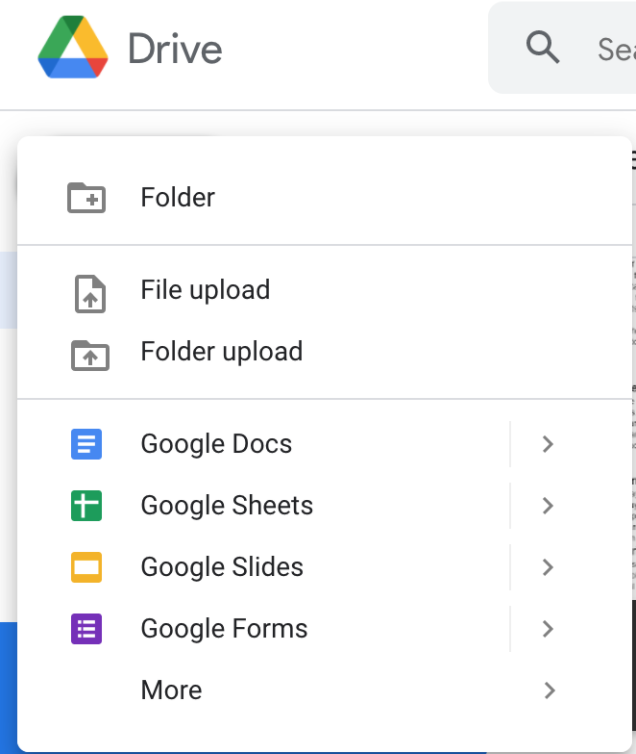
- On your old laptop, open Google Drive.
- To upload the files from your old device, click on the ‘New’ button located in the upper-left corner - the icon has a ‘+’ next to it.
From the drop-down menu, click on ‘File Upload’ or ‘Folder Upload’, and select all files/folders you plan on transferring to your new laptop.
Note: Before you start uploading all files to Google Drive, make sure to log into the same Google account that was formerly used on the old Chromebook, and use the same account to log into the new Chromebook.
This will make the process of transferring the files much easier since you’ll be able to access the files without needing permission from one account to the other.
✔ Also, read how to invert colors on Chromebook.
How do I access the files I uploaded?
After you upload all files and folders you’ll need to Google Drive; you’ll need to launch your new laptop. Open the Google Drive website, and log in using the account that you previously uploaded all files.
On the home screen, you’ll see all folders and files you previously uploaded to Google Drive, and you’ll be able to access them at any time. However, bear in mind that Google Drive allows up to 15GB of free storage, and afterward, you’ll need to purchase more storage in order to keep uploading.
Additionally, you’ll also be able to access all your data from your phone. Google Drive is available on both the App Store and Google Play Store, for both iOS and Android users.